

This is your first and only warning that this post will be both EPIC in length and in detail. Over the course of the past 12 months I have been able to start, grow, measure, and monetize this very blog. A post like this would had saved me a lot of time and frustration. So today I am going to detail the entire process of creating a blog to ultimately flipping on the monetization switch. I am going to write the post (well really a series) that I wish I had when I launched Gen Y Finance Guy.
This comprehensive guide will also act as a standing resource that I can point people too who reach out for my help, and there have been a lot of you doing that lately. As you all know I am all about sharing and full transparency, but I am also very much about scalability. Frankly the growing number of request is becoming a bit much for me to keep up with, thus this guide.
Scalability is the ability of a system, network, or process to handle a growing amount of work in a capable manner or its ability to be enlarged to accommodate that growth. – Wikepdia
Don’t you hate those how to posts that never really delve into the nitty gritty details? Or what about those guides that only give you one piece of the puzzle?
Note: This post and the series to follow will forever be pinned to the menu bar to the left under Start a Blog.
My promise to you is to be as detailed, specific, and as thorough as possible. The reality is that there are actually a lot of moving pieces when it comes to creating a successful blog. Thankfully advancements in technology have made the process manageable for normal folks like you and I.
There are likely four types of people reading this guide:
- People who want to start a blog but don’t know where to start.
- People who figured out how to start a blog but need help with growing, measuring, and monetizing.
- Seasoned bloggers who want to optimize their earning potential online (specifically with passive income through ads and affiliate marketing).
- Everyone else. You have your reasons 🙂
Disclaimer: The blueprint I am about to layout is based on my own experience and research. Also you should know that some of the links below are affiliate links and I will earn a commission if you purchase through those links. I have used all of the products listed below and recommend them because they are helpful and are companies that I know, like, and trust.
Now that we got that out of the way, shall we start?
How to Start, Grow, Measure, and Monetize a Blog
So you want to be a blogger? It has never been easier to get a blog up and running. You should know before you get started that this blogging thing is a lot of work if you want to do it right. Getting up and going is the easy part, the hard part is keeping to a consistent writing schedule. This is why it is imperative that you choose a topic that you are passionate about, something that you could talk and write about all day long.
How to Start a Blog
Step 1: Choose a topic
This hardest step in this entire process is choosing the right topic. You don’t want to make the mistake of choosing the wrong topic.
The possibilities are really endless. Make sure you choose a topic that you really enjoy talking about. Now, you will get mixed advice out there on the web. One camp will tell you to niche down as much as possible, you know like going an inch wide and a mile deep on a topic. While the other camp will tell you that nicheing down isn’t necessary.
The problem I find with really nicheing down is that it feels very confining and for a non-conformist like myself, that just doesn’t work. Let me give you an example. Before I landed on Gen Y Finance Guy I threw around the idea of starting a blog around investing with options. This is something that I love to talk and teach people how to do, but it is only one of many interests I have under the personal finance umbrella. I even went as far as registering the domain name “theoptionstrading.club”.
Knowing my personality I knew it was too narrow of a topic and that if I was going to make this blogging thing work that I would need more variety than that. So I opened up the aperture until I finally landed on the very broad topic of Personal Finance. This is the stake in the ground that creates a solid foundation for my blog.
You may need to go through this same soul searching process.
Use these questions to help you decide a topic:
- What are some of the topics of your favorite blogs?
- What are you passionate about?
- What are you good at?
- What kinds of questions do your friends and family constantly come to you with?
- What are your favorite books about?
- What are your hobbies?
- What is your educational background?
- What are the skills you have that you get paid to do?
- Will the topic be relevant 1-year, 3-years, and 5-years from now?
- Could you easily come up with at least 100 post ideas to write about?
- What is missing from the world that you think you could provide?
Really spend some time answering these questions and figuring out what topic you think you could write about. Don’t get too caught up in the money potential of blogging just yet. The last thing you want to do is choose a topic just because you see others making good money writing about the topic. If you choose the right topic, one that you can write about consistently, then I guarantee you there will be a way to make money from it.
What do you want to do every day for the rest of your life?
I hope you see the importance of choosing the right topic. Every house needs a solid foundation and so does your blog.
Okay, you have your topic and now it’s time to move forward.
Step 2: Register your domain (website name) and sign up for hosting
Now it is time to choose your domain name. Ideally you will want to come up with a domain name that contains keywords or clues into what your site is all about. Take my site Gen Y Finance Guy for example. My target audience is Generation Y and my chosen topic is Finance. It’s also good to try and come up with a name that is easy to remember. Most experts out there recommend that you choose a domain with 3-5 words.
Once you have thought of some possible ideas it’s time to head over to Bluehost to see if you domain name is available. I recommend Bluehost because you get the domain name free with any of their hosting packages. Once you click the link above you will land on the following page:

- Click the green button “get started now”
Then you will be asked to choose a hosting package. You can select the starter plan at the $3.95/month negotiated rate that you get for using my link above (it’s normally $5.99/month). Sometimes it pays to have “Internet Friends.”

Once you have selected your hosting plan you will be taken to the page below where you can check the availability of your domain name ideas:

Hopefully you will be able to get your first choice. Once you find a domain that is available the next button will take you to the final sign up page where you will enter in your personal details and select the package information settings. Below are the settings I recommend:

You will notice that in order to get the best price at $3.95/month that you will need to pay 36 months up front. But you’re in this for the long haul right? What other business in the world can you start for less than $150 bucks in the first year? Let alone for the first 3 years? Trust me it’s a great deal and exactly how I got started. Best of all they have a great refund policy if you decide this blogging thing isn’t for you. If for some reason you decided to cancel they will give you a prorated refund. So the risk is as low as it can be, plus don’t forget they are also throwing in the FREE domain name (that normally costs $10 to $14 on its own).
The only other option you will see checked in the screenshot above is for Domain Privacy Protection. This shields your personal address and phone number from being displayed to the public. This is especially important if you are trying to maintain anonymity.
Finish filling out the page with your personal details, payment method, and then press submit to finalize the process.
Note: you could get a free blog by using a site like blogger.com or wordpress.com. However, if you intend to make money and have full control and ownership over you content you will want to make a very small investment and pay for a domain and basic hosting package. You will have the most flexibility to monetize and customize your site if you own it. I actually had a friend a few years back who had a free blog on blogger and google decided to shut him down and he lost 2 years worth of content that he was never able to get back.
Step 3: Install WordPress
Once you have finished the registration process with Bluehost you will want to install WordPress onto your new website. WordPress is a blogging software application that makes managing and customizing your blog super easy. Not only is it super easy to use, but Bluehost makes it super easy to install with just a few steps. Think of WordPress like a car that comes with an automatic transmission instead of a manual.
Here’s how to install WordPress in 4 easy steps:
- Login to your Bluehost account locate and click the “Install WordPress” icon under the “website” section of the default login page (see below).

- On the next screen under the “Do it yourself” option, click “Install” button.

- On the following screen you will click the “Check Domain” button.

- Check the terms and conditions box and then click the “Install Now” button.
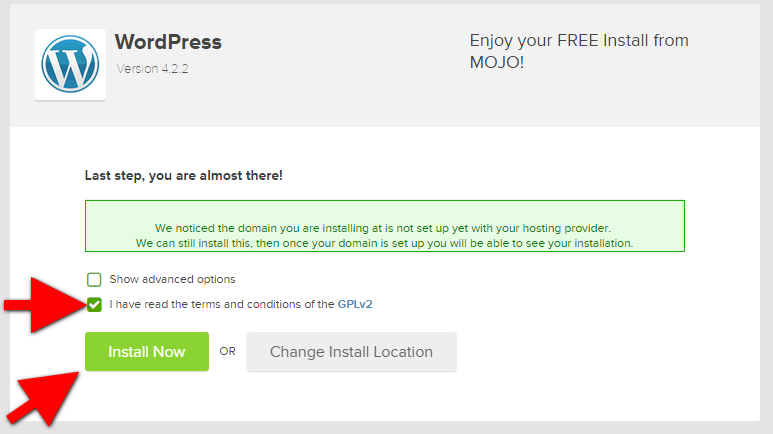

I told you that it would be easy. Could you imagine what setting up a website used to be like before software applications like WordPress? It should only take a few minutes before you are presented with the installation completion screen. You might see a pop up with Bluehost trying to up sell you a custom theme, but I am going to show you how to start off with a free theme and upgrade later if you choose.

Once you close the popup window and once the message in the top left corner of the screen reads “You install is complete!”, you will want to click on “View Credentials” in order to retrieve pertinent login information to your new website. It’s important to do this right away because this information will only be available for 12 hours after the install. On the next screen go ahead and click “View” (circled in red below).

Save these credentials in a safe place. This is how you will be able to access your new website to write blog posts, customize the theme (the way it looks), and manage everything else related to your blog.
Note: You will also get an email reminder with everything but your password.

Step 4: Login to your new site
Are you ready to login to your new site?
Type your Admin URL into your web browser. You’ll see a login screen like the one below. Enter your Username and Password you copied down from the previous step.
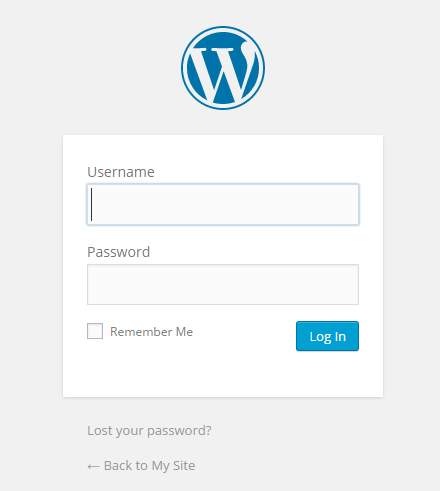
You are officially logged into your new blog and you can begin writing blog posts, adding pages (like “About”, “Contact”, etc.), and picking a theme (this controls the way you site looks). During your install your blog was installed with a default theme called “Twenty Fifteen” (depending on what year you are going through this guide).
Step 5: Install Plugins
Now that you are able to login to your website it is important that we take care of a few technical pieces that go along with starting off your blog right. The list of plugins I am about to list are what I consider mission critical to have a solid foundation to your new blogging venture. However, let me preface that with the fact that this is not an exhaustive list, and in fact there are thousands of plugins out there.
Do keep in mind that the more plugins you install the higher the risk of issues you may have down the line with incompatibility. I am not trying to scare you away from plugins, because they are absolutely a god send in making some of the more technical aspects of blogging so easy. It is just better practice to only use the plugins you absolutely need.
With that said, let’s dig into the 10 MUST HAVE plugins:
- Google Analytics by Yoast – This plugin makes it simple to add Google Analytics (GA) to your WordPress site, adding lots of features, e.g. error page, search result and automatic outgoing links and download tracking. We will cover signing up for an GA account later in this guide, but this plugin makes it as easy as copy and pasting your GA ID and voila! Your going to want to set GA up as soon as possible, because this is how you are going to measure the effectiveness and success of everything your doing online.
- Akismet – Used by millions, Akismet is quite possibly the best way in the world to protect your blog from comment and trackback spam. It keeps your site protected from spam even while you sleep. This plugin automatically checks all comments and filters out the ones that look like spam. In the beginning you won’t have that much spam, but it does grow as you grow. No need to publish useless comments.
- SumoMe – Free Tools to grow your email list. It is going to be very important to start growing your email list from day one. This tool integrates very easily with all of the major email platforms like MailChimp and Aweber. I personally recommend Mail Chimp because they allow you to use their platform for free until you get 2,000 people on your list. But we will get more into list building below. For now just make sure you install this plugin.
- WordPress SEO – The first true all-in-one SEO solution for WordPress, including on-page content analysis, XML sitemaps and much more. SEO won’t be your primary focus early on, because it will take months and sometimes longer before the search engines start sending you traffic. But this plugin is going to help you easily input the important elements that help the search engines determine whether the content on your blog is relevant and a good fit for a search query. It will also automatically generate an XML sitemap for your site that basically gives the Search Engine a blueprint of your entire site. This is what they call indexing.
- Pretty Link Lite – Shrink, track and share any URL on the Internet from your WordPress website! This is going to be really important when we start talking about affiliate marketing int he monetization section below. This is a plugin that is going to allow you to cloak your affiliate links and make them “invisible” to the search engines and more friendly to your visitors.
- Microblog Poster – Automatically publishes your new blog content to Social Networks. Auto-updates to Twitter, Facebook, Linkedin, Google+, and more. This is a great tool to get get your content out on social networks with out any additional effort from you.
- Quick Adsense – Quick Adsense offers a quick & flexible way to insert Google Adsense or any Ad code into a blog post or widget. Another plugin that will be critical once we get into the monetization section.
- WP Smush – Reduce image file sizes, improve performance and boost your SEO. We don’t live in a dial up world anymore, people have come to expect a fast loading website. This plugin along with the next one will help keep your site light and speedy.
- W3 Total Cache – This plugin is designed to improve user experience and page speed. It caches certain elements of your site that don’t change very often so that subsequent load times get reduced. Let’s say a visitor comes to your homepage for the first time and it takes 4 seconds to load. When they come back that same page may only take 3 seconds because it now has a stored copy of the static elements of your site.
- Simple Content Templates – Over time you will likely want to create a template that you use for your posts and this makes it super easy to do. For example, I have started including an email capture form at the end of each of my posts. This makes that easy to set up once, so that every time I start typing a new post, this is automatically included.
These are the 10 plugins that will have you running sprinting out of the gate at launch. Like I mentioned above, this is not an exhaustive list, but form my own experience these are the ones that I would classify as mission critical. As a frame of reference, my blog is only running 15 total plugins, 4 of which are specific to my premium theme.
Step 6: Choose a Theme (Free or Paid)
The next step in building your blog is choosing a theme. A theme allows you to control the look and feel of your website. WordPress carries hundreds of FREE themes that you can choose from. At some point you will probably want to pony up and pay for a paid theme, but I think it is totally okay to start out with a FREE theme when you start. That is exactly the route I took when I launched my blog. In fact the FREE theme that I recommend is called “Convac Lite”.
Note: Eventually I updated to the X-Theme in order to achieve the look of a more professionally designed site. It also comes with way more options to customize and has built in tools that make your blogging life easier. Let’s just say it was $65 well spent. And the only other thing I would point out is that you also have the option of paying for a custom designed site that could run you anywhere from $300 to $3,000 depending on who you go with and what you are trying to accomplish. But you can cross that bridge when you get there.
Let me walk you through the process of choosing and activating a theme on your new blog:
Step 1: Login to the admin portal on your new site: example “www.your-site.com/wp-admin” (just replace “your-site” with the actual name of your site. And don’t forget to change the “.com” if you have something else like a “.net” or “.us”, etc.)
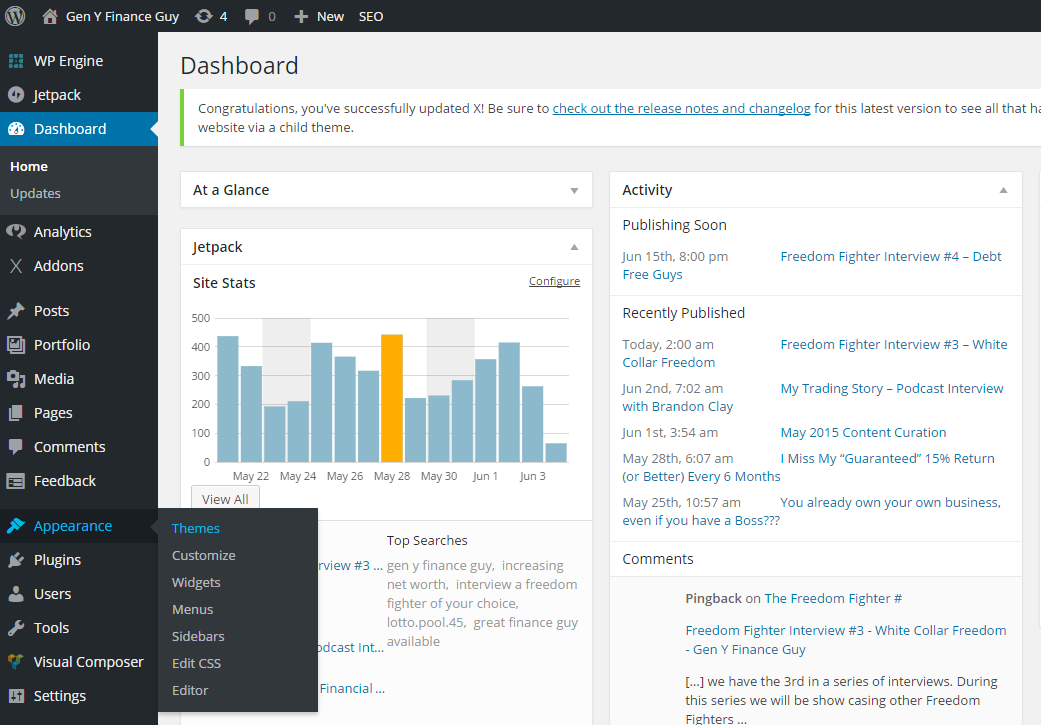
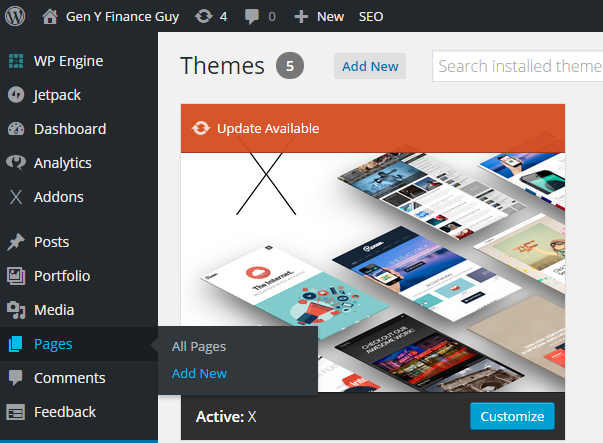
Step 2: Once you are logged in you will have a menu bar on the left hand side. Locate the option where it says “Appearance” and hover your mouse over that option to activate the menu and then click “Themes” (see below):
Once you click on “Themes” it will take you to this page:
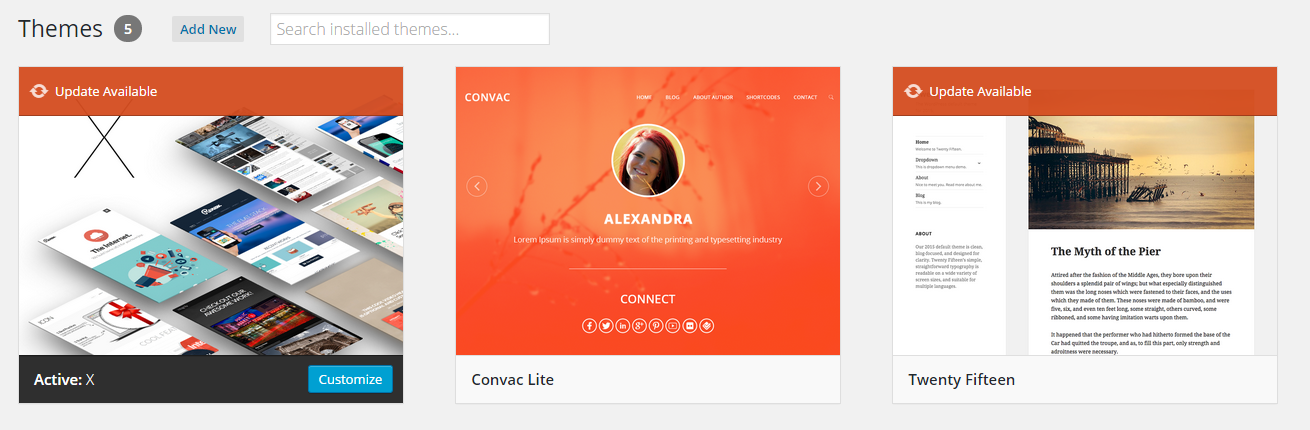
You will notice from the screenshot above that I have already installed the “Convac Lite” theme that I recommended above. In order to browse and search the Free themes that WordPress provides you will just click “Add New” in the screenshot above. Then once you find the theme you want it is a two-step process to get it live on your site.
First you will install it. Then from the themes menu (screenshot above), you will hover over the theme you want to activate and click “Activate.”
Once your theme is active you can then customize it to your liking.
Step 7: Create Pages (i.e, “About”, “Contact”, etc.)
Pages are usually where people ended up landing when they click a button or link from you menu bar. Two of the most popular pages that you typically find on every site on the internet are the “About” and “Contact” page. These are probably the two I recommend you start with and you can always add other pages later.
Note: Going forward I am going to assume that you are already logged into the admin panel of your website. So I will be omitting that as a step.
In order to create a new page all you have to do is locate the “Pages” menu on the main menu bar, then hover over pages and select “Add New“:
And then you will be taken to the new page where you can enter a Title (this will be what is displayed in your menu bar on your live site) and your pages content:
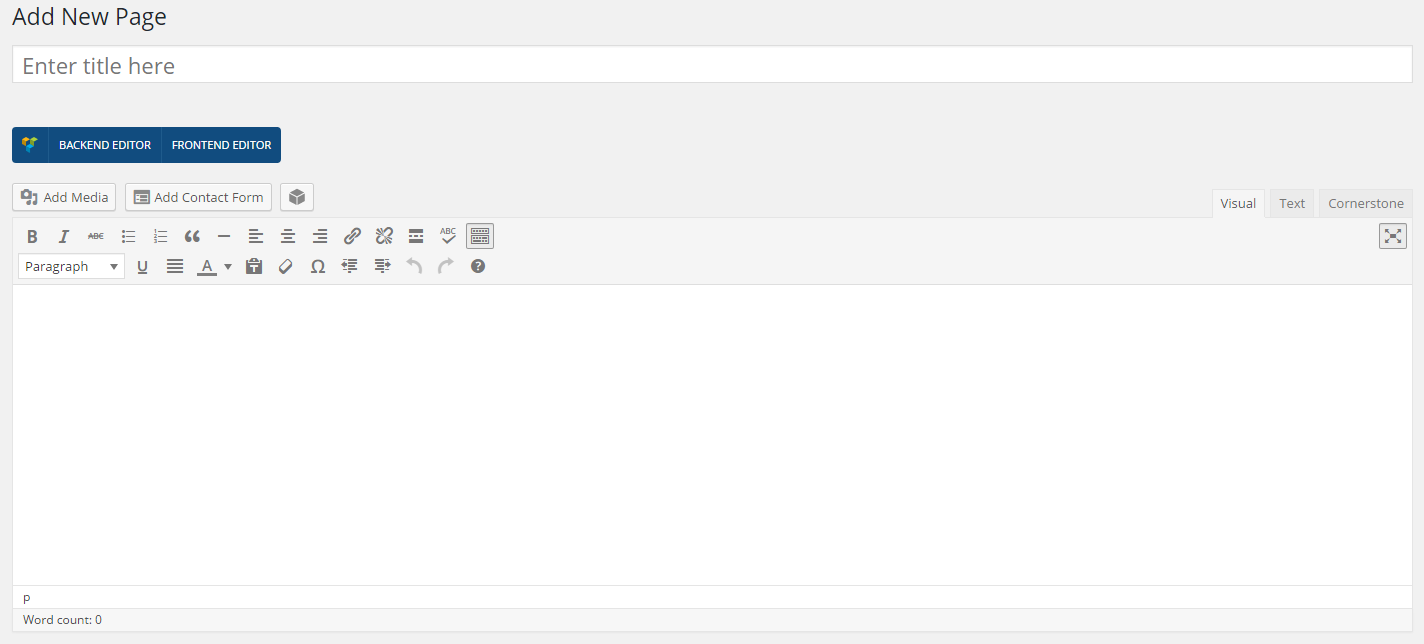
Once you finish populating your new page with a title and your content you can either publish to go live immediately or save it as a draft to come back and work on and make changes at a later time.
Step 8: Publish Your First Post
Adding a post is exactly the same process as adding a page. The only difference is now you are going to locate the “Posts” menu and then select “Add New.”
Congratulations
You are officially a blogger. It is now your duty to create content that incorporates your unique story and view out to the world. There are people waiting for someone like you to relate and connect with. There are people out there that need to learn from you. The world is waiting for that something that only you can can give. Do not take this position lightly, people are depending on you.
SERIOUSLY!!!
-Gen Y Finance Guy
p.s. if you are ready to start a blog, use this link Bluehost to get $3.95/month instead of $7.99 (a little more than a 50% discount). You also help me out if you use this link or any link in this post 🙂
17 Responses
This is great GYFG! This would have been super helpful when I started blogging. I had to piece together info from multiple websites. It worked but it took forever. Can’t wait to see the next installment in the series.
You and me both Thomas. So many people were asking me questions, that I finally had to write the guide to point people too in order to not answer the same questions over and over again 🙂
More to come…
Olå Gen Y Finance Guy!!! This is awesome info. Thanks for sharing. I love that I already have most of these steps down. Now for a topic mmmmmm. I need to work on step one. ” Foundation”
Enjoy your day
Blessings
You got this Nuno! Come back and let us know once you land on a topic 🙂
This is very helpful. Especially the plugins section, as I had no clue any of that stuff existed until I started blogging. I joined a blogging community that also provides hosting so they had a decent number of these already pre-installed but still had a large learning curve.
Very nice Josh!
I definitely wrote this from a “mans I wish I had this” when I started.
Cheers!
Wow what a write up! Thanks for sharing the plugins as there are some I should install on my blog as well.
Tawcan – Glad you found a few nuggets in there that you could use for your own blog.
BTW, your guest post will officially go live on 2/22/16 as Interview #22. Looking forward to sharing it with the GYFG community.
This was a great post, I’ll need to refer back to this one from time to time. You broke it down barney style to start a blog!
The hardest part for me would be to create content and write! Basically the actual guts of a blog.
I would say fear and laziness has stopped from starting. Well maybe not laziness, as I do apply my self to many other tasks in life to make money and create income. But stepping into the world of blogs just seems so foreign to me. I read a handful of blogs out there, but I never thought I could be a blogger.
You bloggers are awesome though, its like a club. I hope to be apart of it one day.
can the domain name be changed afterwards without much hassle?
Ap999, you can change your domain after, but it can be a bit of a pain. Although I am sure it is getting easier to do.
Great post GenY. I know it is only slightly more than a year, but how much is the monthly income from the blog? And can you break it down by affiliates v/s adsense v/s sponsor?
This was a great guide! Thanks!
Several years ago when I first started a blog, I didn’t even bother to look at the how to start a blog posts. I probably didn’t notice them, but I felt at the time there weren’t that many detailed guides, but now I feel like there are quite a few which is great for people who aren’t sure how.
One thing I regret when I first started was not going self-hosted right away. At the time I couldn’t justify paying for it And it doesn’t even cost that much to become self-hosted. Lol. Here I am several years later, investing in a blog design and logo, business cards and blog e-courses.
Agreed Karen! Self hosted is the way to go.
I wish I had found a guide like this when I first started blogging. It would had saved me a lot of time.
Great post. What plugin do you use for the comments section on your posts?
I am just using the standard WordPress plugin.